How do we use our existing skills and knowledge to support the Black Lives Matter movement? In addition to using my social media voice, I want to inspire ppl to use their creativity and skills to make tangible change.
I know how to make cool stuff with new technology. I professionally create 3D models for a living.
I created a beautiful black rose with Gravity Sketch, made fully in VR. It is available on Sketchfab for $10. 100% of the proceeds will go to support the Black Lives Matter movement. Half will go to Black Girls Code (structural change), and the other half to Color of Change (local action).
Use this asset for your VR/AR projects. Use it to populate your VR environments (if you want, the rose’s color/shader can be easily edited). Put it into a vase in your VR office environments. Place it into your virtual Animal Crossing island and water these black roses with your golden watering can. Either way, you’ll be showing your support to Black Lives Matter by donating $10 for the asset, and it’ll be free for you to use.
I believe there needs to be more accessibility to young black creators, especially those who want to use tech and make cool things with new tech. Below is a free tutorial for making an Augmented Reality filter using the black rose asset.
To young black creators: I’ll give you the file for free. DM me on IG, Twitter, or FB. :) I’d love to see your creations!
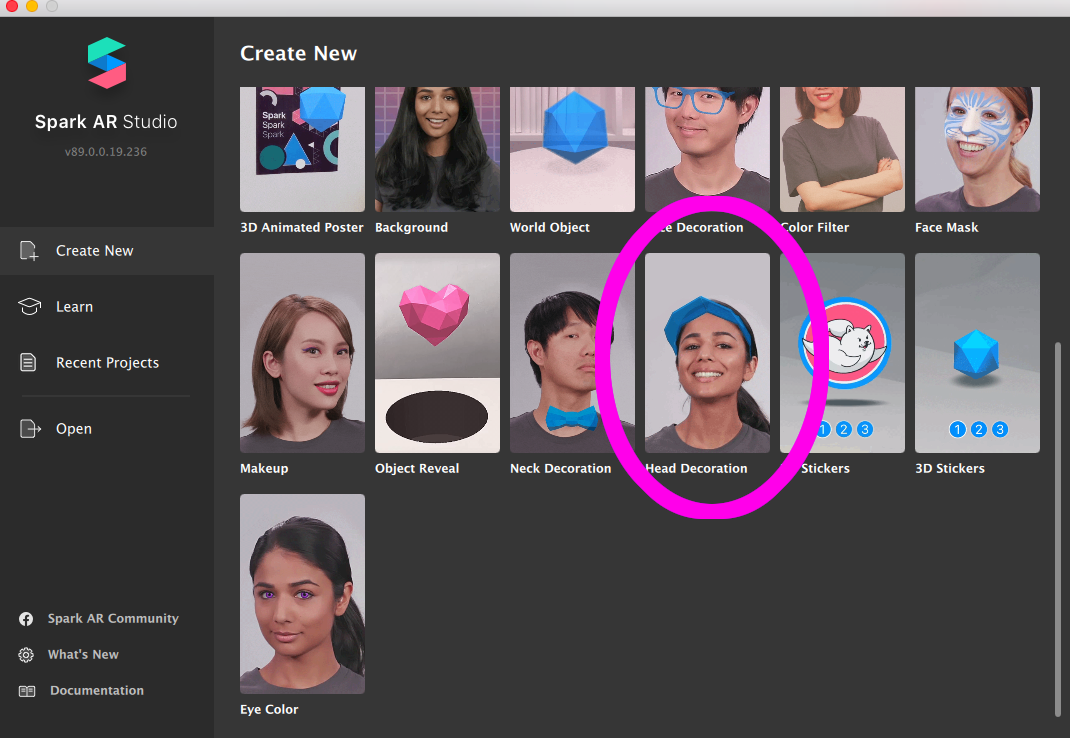
3. In SparkAR, create a New Project with the Head Decoration template
You’ll see the new project open and a demo of a man with a AR hat.
In the left side menu, look for the PAUSE button to stop the demo animation. This will help with the next steps.
4. At the bottom of the left menu, click on + Add Asset. Then select Import from Computer…
Choose the Sketchfab downloaded file.
5. Drag “blackrose” from the Assets window, and drop it to the Scene window where it says “dragHere”. This creates it as a ‘prefab’ in the Scene.
Delete the thing that says “deleteMe” :)
6. In the Assets menu, select the thing that says “Standard000000”. (This is called a Shader btw, and is what gives the rose a black color).
On the right hand menu, you can click on the Color box and adjust the color to be a little bit lighter so you can see all the details on the model. Also click on the box that says “Double Sided [x]” so it is selected. This will make sure the model will appear correctly for the filter!
7. Right Click on “blackrose” prefab. Select Duplicate. Do this so then there are 3 “blackrose” prefabs total.
It should look something like this. Double-check and make sure your blackrose prefabs are in the same structure as mine on the left menu. :)
8. Positioning and Rotation of roses. Choose one of the blackrose prefabs, then at the top of the menu, look for the POSITION and ROTATION buttons. These are the tools you’ll use to position your roses
Edit the position and rotation of the roses to your liking! Press the “PLAY” button on the left bar (where “PAUSE” button was before) to see if the roses look good at all angles.
9. Activate your computer’s camera to see how you look with your creation! Above the Play/Pause button, click on the CAMERA button. Choose your camera (mine is called “FaceTime HD Camera”) and click PLAY! Make any edits for the rose positions if you need.
10. Look super cute~
Congratulations on making your SparkAR project!
Do you want to share your creation on Instagram? Read about submitting it to the Spark AR Hub here.
A month ago, I attended my first VR Hackathon, not knowing what to expect, nor where I would fit in.
I consider myself new to Unity.
I can draw really well.
I can dev.
And I sure as hell can learn really fast!
I teamed up with two lovely ladies, Katie Hughes and Nidhi Reddy. We teamed together, spent the first night listing out all of our ideas of what we could create in the next 48 hours. There was a competition component to the Hackathon, but honestly, we just wanted to LEARN and just head towards our goals!
With amazing camaraderie, communication, playing on our strengths, and respect for each others' process, we were able to go from knowing minimal Unity to building our first run of HoloDog!
Katie was our idea guru. She is FULL of ideas, and we were able to create a compelling reason for creating this (to be unveiled in the future)! Katie was our strategist, figuring out how the UX of the HoloDog would play out in future iterations.
Nidhi is our super amazeballs AR developer. She learned how to do the speech-integration with the HoloLens in a day, and endlessly troubleshooted the deployment and user interaction portions of development. She handled all things HoloLens.
I played the role of "time keeper" to make sure we were hitting our goals, checking in appropriately throughout the weekend, maintaining good communication with each other. I was also the "dog wrangler," handling all things pertaining to dog interactions, from the model to developing the trigger responses within Unity. I was responsible for all things related to the actual HoloDog.
Here's a little bit more about our process and how we built our beloved "Buster, the HoloDog." :)
omgwtfamidoinghalpOkay. I'm in charge of the dog.
Okay.
What does that even mean. Where do I begin. What. How do I make a virtual dog come to life. What. Halp.
Step One: Find an asset.
Step Zero: Practice being an optimistic learner. Understand the Basic Workings of 3D Animation
Well, me being my "I wanna make everything from scratch" self, I wanted to see if I could rig and animate the dog myself. Yes, in less than 24 hours. That's how optimistic I am. So I called up my 3D technical artist friend for advice on where to start. He pointed me to this Lynda.com Maya tutorial on how to rig and animate a dog.
Mmmhmm. So, 10AM on Saturday of our weekend Hackathon, I jumped into learning Maya basics (from UI to functionality), and then onto rigging. I spent a few hours fully immersing myself in learning this very crucial part about asset making.
Step One: Find an asset.
So then I realized I wouldn't have enough time (I know, I know. I can try, right??) to learn everything and also to naturally animate a quadruped. Around lunch time, I revised my plan and looked into existing dog assets on the Unity store. For the goal of having a working prototype by Sunday noon, we found this really great 3D dog pack by Nitacawo. It had sit, trot, barking, etc animations. It was perfect! We began building with our lovely beagle, Buster! :D
Step Two: Plopping Buster into Unity
Download Unity.
It's free, and almost all AR/VR things are built with Unity. It's a really critical software to learn, if you want to dev for AR/VR!You'll have to learn some of the basics of Unity. Luckily, they have documented really helpful tutorials. If you're getting started with Unity, this should help: Interface & Essentials. From there, maybe do the Roll-a-Ball tutorial to learn the game engine interface in application.
Create a New Project.
Mine is called "DogTest" hahah
Save your New Scene.
I saved it as "DogScene"
Import the Dog Pack Asset into your project.
In Unity, go to your Project window. In the "Assets" folder, create a new folder called "Models". Drop the 3D Dog Pack into the "Models" folder by dragging from your Finder/Explorer window.You can also import by going to menu Assets > Import New Asset..
Make sure you keep your 3D models in the "Models" folder to keep things organized and happy. :)
Drop in Buster!
From the Assets > Models folder, open up the DogPack. Open up one of the dog folders. I selected "Beagle" for our model HoloDog.The first thing you'll see in that folder is named "Beagle"
Drag and drop that into your Unity scene.Ta-dah! You should see your dog there now!
You should see a GameObject listed as "Beagle" in the Hierarchy window now, too.(You'll see some child-elements associated to the "Beagle" GameObject. One is called 'Beagle' and the other is called 'Bip003'. We won't be touching those, so no need to worry about those. We'll only be working with the parent "Beagle" GameObject.)Fantabulous! Time to give him some behaviors!
Step Three: Attach Behaviors / Animator Controller to Buster
Here we're going to create the different animation states for the dog, associating the animations to the states we create.
Create a new Animator Controller
In your Unity Projects window, in the Assets folder, create a new one called "Animations"Create a new Animator Controller by right clicking in your new "Animations" folder to find it in the "Create" > "Animator Controller" popup menu. You can also find it by going to your Projects tab and looking for the "Create" button.Name this "BeagleAC" and double-click on the file. You should be in the "Animator" tab now.
Associate the new Animator Controller to Buster
In your Scene window, click on Buster the dog.Do you see in the Inspector window the Component called "Animator"? There is no controller associated to the GameObject.From your Assets window, drag and drop "BeagleAC" into the Inspector > Component > Animator > Controller field. This will link the new animator controller to the GameObject.
Create the Parameters for the animations
In the "Parameters" window, look for the little plus (+) symbol. Click on it and select "Trigger". Name this trigger "Sit".Create two more triggers: "Up" and "Speak".
Drop in the "Sit" animation clip
From your Project Assets window, go to Models > DogPack > Beagle and look for the file called "Beagle@BeagleIdle".Drag and drop this into the "Animator" window.
You should see it show up, and it'll be highlighted orange. This means that it will be the default state when the game starts.Then, drop in the file called "Beagle@BeagleIdleToSit". This is the animation for a standing dog to sitting dog.
Create a Transition from IDLE --> SITRight click on the orange BeagleIdle bubble.
Select "Make Transition" and an arrow will show up.
Click on the "BeagleIdleToSit" bubble.Click on the arrow itself.
The "Conditions" window associated to the transition will be blank.
Click on the (+) button to create a new condition.
Select "Sit"
Yay! The animation part is set up and ready to go! Time to type up the trigger script so that the dog knows WHEN to Sit.
Step Four: Write the Trigger Code Behaviors
Create a New Script.
In your Inspector window, click on "Add Component" > New Script and name it "BeagleScript". Click on "Create and Add"
Open the New Script.
Double click this newly created script to open up your script editor.
Name the Animator variable and give "Sit" an id.
This first bit is to give our animator variable the name of "anim" to contain our animator object. We're also calling on the parameters strings called "Sit" and giving it an id to be used in the code.
using UnityEngine;
using System.Collections;
public class BeagleScript : MonoBehaviour {
Animator anim; //calls on "animator" variable, called "anim", to contain animator object
int sitHash = Animator.StringToHash("Sit"); //gives an id to the parameter "Sit" so it can be called upon int upHash = Animator.StringToHash("Up");
// Use this for initialization
void Start () {
anim = GetComponent (); //references the animator object called "anim"
}
// Update is called once per frame
void Update () {
if (Input.GetKeyDown (KeyCode.Space)) { //when "space" key is pressed, Trigger the animator transition parameter called "Sit"
anim.SetTrigger (sitHash);
}
}
}
Reference the Animator Object
Then, we reference "anim" to the Animator Object in the Start function.
using UnityEngine;
using System.Collections;
public class BeagleScript : MonoBehaviour {
Animator anim; //calls on "animator" variable, called "anim", to contain animator object
int sitHash = Animator.StringToHash("Sit"); //gives an id to the parameter "Sit" so it can be called upon int upHash = Animator.StringToHash("Up");
// Use this for initialization
void Start () {
anim = GetComponent (); //references the animator object called "anim"
}
// Update is called once per frame
void Update () {
if (Input.GetKeyDown (KeyCode.Space)) { //when "space" key is pressed, Trigger the animator transition parameter called "Sit"
anim.SetTrigger (sitHash);
}
}
}
Write the trigger script.
Then, we write a trigger so that when the "Space" key is pressed, the IDLE->SIT animation is triggered.
using UnityEngine;
using System.Collections;
public class BeagleScript : MonoBehaviour {
Animator anim; //calls on "animator" variable, called "anim", to contain animator object
int sitHash = Animator.StringToHash("Sit"); //gives an id to the parameter "Sit" so it can be called upon int upHash = Animator.StringToHash("Up");
// Use this for initialization
void Start () {
anim = GetComponent (); //references the animator object called "anim"
}
// Update is called once per frame
void Update () {
if (Input.GetKeyDown (KeyCode.Space)) { //when "space" key is pressed, Trigger the animator transition parameter called "Sit"
anim.SetTrigger (sitHash);
}
}
}
Save the script.
Step Five: Testing!
Return to Unity.
Press "Play" to run the game.
Press the Space key on your keyboard.
Does Buster sit??! Does it look something like THIS?!
Step Six: Pass it to Nidhi!
I repeated the above steps to associate "Up" and "Speak" and "Play Dead" to Buster. I wanted to make sure all of the script and Unity components were all in order before passing it off to Nidhi, who tackled all of the HoloLens and speech-recognizing portions of this project. Wizard! She'll be posting her portion / experience from this Hackathon soon -- I'll be sure to link to her when she has it up! :)
This is a three-part roundtable blog post with Katie and Nidhi! Read all about Katie (UX and event roundup) and Nidhi's (HoloLens development) experiences!